LATEST SETTINGS OF TUNNELGURU VPN WITH MTN
First register at the tunnelguru webpage to obtain a username and a password. Click here to register for an account [ It may take few minutes to reach account info in your In/Spam Box].
Download the tunnelguru software. Click here.
Unzip and run the software.
Note: The file is zipped, and you must unzip the downloaded file to use it. To unzip a file you need an unzipping software like Winrar. Download Winrar here or here if you don't already have it. To learn how to unzip a file click here. The software runs in a java environment, download and install java run time from here if you don't have java run time in your system.
Launch the software and the window will appear like this below.
Note: This software has both VPN and HTTP tunneling as you can see from the screen shot below.
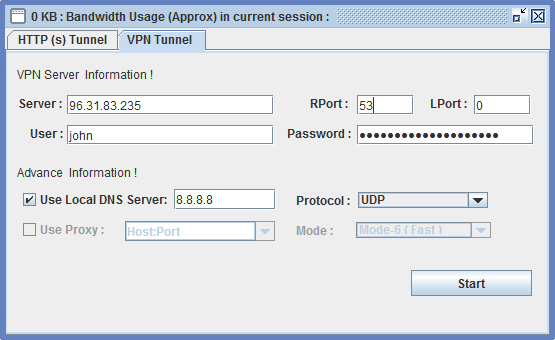
For the VPN tunnel settings
 |
DO NOT USE THE SETTINGS ON THIS PIC. IT IS FOR ILLUSTRATIVE PURPOSE |
Click the VPN Tab
In the server box above enter any of the different servers you like to use. Here is a list of some of their available servers with their corresponding port numbers.
Server -96.31.83.235 Rport - 9200
Server -96.31.83.234 Rport - 9200
Server -199.167.145.167 Rport - 9200
Server -199.167.145.171 Rport - 9201
Server -96.31.83.235 Rport - 53
Server -96.31.83.234 Rport - 53
Server -199.167.145.167 Rport - 53
Server -199.167.145.171 Rport - 53
For a full list of servers click here. Ensure to always use less loaded servers.
Input the corresponding port number of the server you chose into the RPort box
For example if you server 96.31.83.235, then you must enter 9200 in the RPort box. Make sure you don't miss this.
In the user and password boxes, enter your username and password respectively.
Check the Use Local DNS Server and enter the DNS server of your system. To get that simply got to your command prompt widow by typing "cmd.exe" in the start menu and then type "NSLOOKUP" and press enter.
Select UDP from the protocol menu and the you are ready to go.
Then click START
BUT WAIT
Before you click START, you have to connect your modem. To do this, follow this step
First, you will have to subscribe to MTN BB plan
MTN BB Weekly --- Recharge N500 and text BBCWEEK to 21600
MTN BB Monthly --- Recharge N1500 and text BBC to 21600.
Then create a new MTN profile in your modem like this
Click on Tools >> Options >> Profile Management >> New
Profile Name: MTN Blackberry
APN: blackberry.net
Username: web
Password: web
Click Advance Tab, select Static and input this 10.199.212.2 into the IP address box
Click Ok, select the new profile and connect your modem.
Note: To unlock your modem simply call me on 07061931240
Then connect the tunnelguru software by clicking START and then you are good to go.
Set you browser and applications to NO PROXY. Happy browsing.
Firefox:

- Go to Tools > Options > Advance > Settings >
- Set to “NO PROXY”
Internet Explorer:

Go to Tools > Internet Options > Connections > >
In “Proxy server” section, Uncheck “Use a proxy server for your LAN”
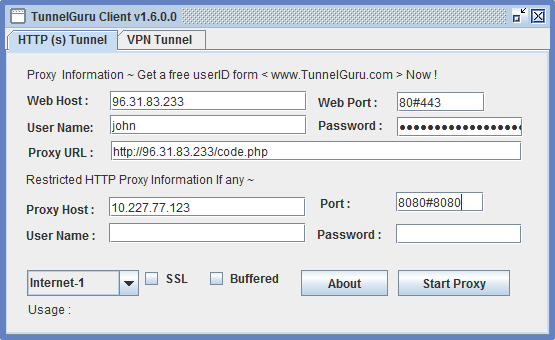
For HTTP tunneling
 |
DO NOT USE THE SETTINGS ON THIS PIC. IT IS FOR ILLUSTRATIVE PURPOSE |
In the Web Host: Enter 10.199.212.2
In the Web Port: 80#443
Enter your username and password
Enter this in the ProxyURL http://10.199.212.2/products-services/internet-services/blackberry
Enter 10.199.212.2 in the Proxy Host bnox
Port 8080#8080
Username: web
Password: web
Select Internet-1
Uncheck SSL and Buffered
Then click START PROXY
Normally Upon Successfully Connection It will enable
127.0.0.1 : 6051 HTTP Proxy
and 127.0.0.1 :
6052 or 6053 or 6054 or 6055 or 6056 SSL Proxy.
It means you can point your Application to 127.0.0.1 and any above port
For example in mozilla you would like to Set 127.0.0.1 6051
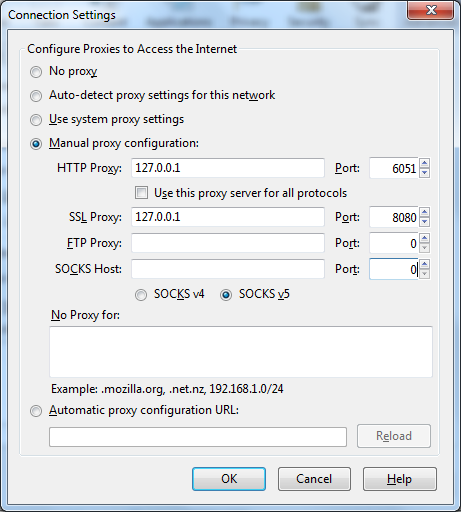
If you want to open Secure ( HTTPS ) sites by pointing your browser to 6051 you need to install TunnelGuru Certificate into Your browser. To learn how to install certificate into your browser click here.
I prefer you use the vpn tunneling as it the most efficient and reliable and very easy to connect. Unlike the HTTP tunneling where you have to use a proxifier in-order to open secure websites like Yahoomail, Gmail, Facebook and others. To use a proxifier with tunnelguru however click here
LATEST SETTINGS OF TUNNELGURU VPN WITH MULTILINKS
For Multilinks you don't have to subscribe to any data plan. If you already have the modem good, but if you don't have you can go to any multilinks office near you to purchase one. Its about #4000 or so. Below is how to install the modem.
STEPS TO FOLLOW WHEN INSTALLING MULTILINKS BLUE BROADBAND ON WIN 7 & WIN 8:
> Insert the modem into your computer or use the auto run feature
> A dialog box will pop up asking you to install the software, click to install
> While trying to install it, make sure you untick the Install Modem Driver options
> This will enable you install only the Multilinks Blue 900 main APP
> Now insert the CD that came with your modem
> A widow will pop up asking you to install, click on start CD to install the appropriate drivers
> However after installing the driver, you will notice that when you launch the application, the network signal will appear. All that is left is for you to configure your modem with the relevant username, password and service number. All other things being equal, your modem will get connected.
HOW TO CONNECT YOUR MULTILINKS MODEM TO THE INTERNET WITHOUT SUBSCRIPTION
This section is for those are for those who finds it difficult to configure there multilink modem to connect to the internet without loading credit or subscribing to any multilinks data plan... First you must install your
modem (as normal) then open the window interface, click on settings and input the following
>Username=7099038916@bluebroadband.com (note that the front numbers varies from modem to modem. to determine yours check the back of your modem pack to know yours) >>>Password =1234 (this is default for all modems) >>>Service number= #777 save and exityou are done. Hurray connect your modem will connect without subscription.
Connect your modem and just follow this procedure.
For the VPN tunnel settings
|
DO NOT USE THE SETTINGS ON THIS PIC. IT IS FOR ILLUSTRATIVE PURPOSE |
Click the VPN Tab
In the server box above enter any of the different servers you like to use. Here is a list of some of their available servers with their corresponding port numbers.
Server -96.31.83.235 Rport - 9200
Server -96.31.83.234 Rport - 9200
Server -199.167.145.167 Rport - 9200
Server -199.167.145.171 Rport - 9201
Server -96.31.83.235 Rport - 53
Server -96.31.83.234 Rport - 53
Server -199.167.145.167 Rport - 53
Server -199.167.145.171 Rport - 53
For a full list of servers click here. Ensure to always use less loaded servers.
Input the corresponding port number of the server you chose into the RPort box
For example if you server 96.31.83.235, then you must enter 9200 in the RPort box. Make sure you don't miss this.
In the user and password boxes, enter your username and password respectively.
Check the Use Local DNS Server and enter this server 82.128.127.3.
Select UDP from the protocol menu and the you are ready to go.
Then click START
Set you browser to NO PROXY and enjoy browsing.
Firefox:
- Go to Tools > Options > Advance > Settings >
- Set to “NO PROXY”
Internet Explorer:
Go to Tools > Internet Options > Connections > >
In “Proxy server” section, Uncheck “Use a proxy server for your LAN”
For HTTP tunneling
|
DO NOT USE THE SETTINGS ON THIS PIC. IT IS FOR ILLUSTRATIVE PURPOSE |
In the Web Host: Enter 212.165.142.226
In the Web Port: 80#443
Enter your username and password
Enter this in the Proxy URL http://212.165.142.226/recharge
Enter 199.167.145.167 in the Proxy Host box
Port 80#443
Select Internet-1
Uncheck SSL and Buffered
Then click START PROXY
No comments:
Post a Comment